

21R1.2 Functionality Guide
The Functionality Guide is intended for Sales Operations, Business Administrators, System Integrators, and others responsible for making decisions about what features are needed for end users to be successful and deciding which features work together with existing customer configurations.
Information includes an overview of each feature, examples, screen shots, and targeted information on how to use each feature. Select the heading link to display the topic which includes configuration instructions, if applicable.
Engage Meeting
Hosting an Engage Meeting on the Veeva CRM App on Desktop
The CRM Desktop (Windows) app can be configured to use Microsoft Edge WebView2, which uses Microsoft Edge (Chromium) as its rendering engine for embedded web content, to present CLM content shared during an Engage meeting. This allows Engage meeting hosts to share video and audio CLM content from the CRM Desktop (Windows) app. See Microsoft’s WebView2 documentation for more information.
For example, Sarah Jones uses the CRM Desktop (Windows) app and has a CLM presentation in her media library containing a video about Cholecap side effects. An Engage admin enables WebView2 for Online Engage meetings. When Sarah meets with Dr. Clinton Ackerman about Cholecap, she starts a meeting from the CRM Desktop (Windows) app and shares the video in her Cholecap presentation in the Engage meeting.
Considerations
- Users must be on a Windows 10 device to use WebView2
- MOV, M4V, and MP4 video file types are supported for video slides. AVI video files are not supported.
Using WebView2 for the CRM Engage App
For optimal results when sharing audio and video content, users should select the following check boxes in the bottom left corner of the CLM media library:
- Share Sound
- Optimize for Video Clip – Selecting this option also enables Share Sound. Videos should be 1080p resolution or below for best results. See Zoom’s documentation for more information.
When sharing CLM PDF content with WebView2 enabled, users can use the standard PDF controls to navigate the content.
Using Virtual Backgrounds on the iPad
Engage and Virtual Event hosts can upload a graphic to serve as a virtual background. Virtual backgrounds enhance the meeting experience by enabling hosts to display an image as their background.
Configuration is not required for this feature.
Considerations for iPad
- Hosts on the iPad cannot select videos for a virtual background
- Hosts must be using one of the following supported iPad devices:
- 5th Generation 9.7 inch iPad
- 6th Generation 9.7 inch iPad
- iPad Pro
- 7th Generation and higher 10.2 inch iPad
- Default images are not supported on Zoom® v5.7.1
Selecting a Virtual Background on the iPad
To add a virtual background from within an Engage meeting:
- Select the More button.
-
Select Virtual Background.
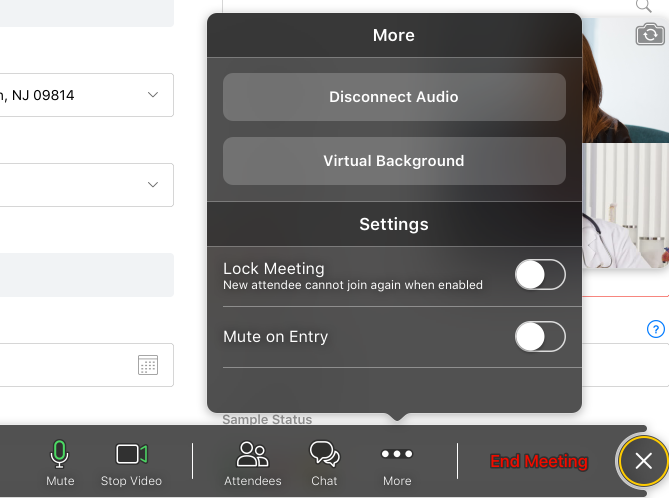
-
Select the appropriate virtual background.

- Select the X button to return to the Engage meeting with the selected virtual background applied.
If the user has a physical green screen set up, they can improve the accuracy of the virtual background using the following additional process:
- Select the More Actions button in the top right corner of the screen.
- Select the Green Screen option.
- Select the physical green screen on the screen to set the correct color.
Uploading Custom Images as Virtual Backgrounds on the iPad
In addition to a selection of default virtual backgrounds, hosts can also select a custom image to upload as a virtual background. Custom images added as virtual backgrounds remain available for selection in further Engage meetings.
To upload a custom image:
-
Select the + button from the Virtual Background selection page.

-
Select the appropriate photo in the device’s library to display a preview of the virtual background.
If they have not done so already, users can grant CRM permission to access their device’s photo library from the iOS settings for Veeva CRM. If permission is not granted, users are prompted to select individual photos or albums to grant access to. The selected photos or albums can then be previewed as virtual backgrounds.
-
Select Use Photo to apply the virtual background.

Events Management
Adding Local Time and Time Zone to an Event
Admins can configure event times and dates to display in the local time and time zone of the event instead of the time zone of the user who is viewing an event record. This helps to reduce confusion when coordinating or communicating with team members, attendees, and speakers who may be in a different time zone than where the event is taking place.
For example, Sarah Jones is collaborating with Charles Levine on an event in San Francisco. Sarah is based in San Francisco, while Charles is based in Boston. When Charles views the event in CRM, the event displays with a time and time zone based on the event’s time zone, Pacific Time, rather than his current time zone, Eastern Time. This helps Sarah and Charles coordinate the event.
Considerations
- This feature replaces the existing Start_Time_vod and End_Time_vod fields on the EM_Event_vod and Medical_Event_vod objects. After enabling this feature, these fields should be removed from page layouts.
- The existing Start_Time_vod and End_Time_vod fields are still maintained for external systems that leverage the UTC format
- For reporting consistency, it is recommended that admins and event organizers update existing events with the new Start Time (Local), End Time (Local), and Time Zone fields after enabling this feature
- This feature interacts with the TIME_ZONE_DISPLAY_vod Veeva Setting in the following ways:
- When both this feature and TIME_ZONE_DISPLAY_vod are enabled, all other date/time type fields continue to display the current time zone of the platform. However, the zvod_Start_Time_vod and zvod_End_Time_vod fields display the value based on the Time_Zone_vod field.
- If this feature is enabled but TIME_ZONE_DISPLAY_vod is not enabled, all date and time fields, including the zvod_Start_Time_vod and zvod_End_Time_vod fields, do not display any time zone value
- After enabling this feature, all new events must have a time zone
- In Lightning-enabled orgs with Lightning for Events Management enabled, the Time_Zone_vod field on the EM_Event_vod object becomes a required field when rescheduling an event
Defining an Event’s Time Zone
To define an event’s time zone, use the Time_Zone_vod picklist. This can be done by either editing existing events, or during the creation of new events.
See the Salesforce list of supported time zones for a complete list of available time zones.
When users select a value from this field, their selection is stored in the Time_Zone_vod field of their associated Preferences_vod record. The value of this field automatically populates as the default value of the Time_Zone_vod picklist.
Referencing Local Time and Time Zones in Tokens
The local time and time zone of an event can be referenced in Approved Emails sent as invitations, as well as Print Templates using the standard {{ObjectAPIName.FieldAPIName}} merge token:
- {{EM_Event_vod__c.Start_Time_Local_vod__c}}
- {{EM_Event_vod__c.End_Time_Local_vod__c}}
- {{EM_Event_vod__c.Time_Zone_vod__c}}
The existing {{EM_Event_vod__c.Start_Time_vod__c}}, {{EM_Event_vod__c.End_Time_vod__c}}, and {{timezone}} tokens can still be used to render the time zone of the current user, rather than the time zone of the event.
Event Expense Limit Rules
Event Expense Limit rules enable admins to set up guidelines and policies surrounding expense limits. Automating this process results in greater compliance by preventing event organizers from adding estimated and actual expenses to an event based on these restrictions.
Several types of Expense Limit rules exist, each of which can be controlled by country and event type:
- Per Event Expense Limit Rule – Limits the total expenses Per Event Expense Type
- Per Event Attendee Expense Limit Rule – Limits the total expenses of an event that can be attributed to an event attendee
-
Attendee Expense Cap Rule – Limits the total expenses attributed to an attendee of a defined event type in a defined time range
This rule uses Expense Attribution records and only applies to actual expenses, not estimates or committed expenses.
-
Cross-Event Attendee Expense Cap Rule – Limits the total expenses attributed to an attendee across all event types in a defined time range
This rule uses Expense Attribution records and only applies to actual expenses, not estimates or committed expenses.
- Actual Versus Estimate Expense Threshold Rule – Warn users when an actual expense exceeds a related estimate expense by a defined percent threshold
These rules can be configured to either warn event organizers of violations or prevent them from proceeding until violations are addressed.
For example, the admin at Verteo BioPharma created an internal list of business processes for running events, pulling from both external compliance regulation and internal best practices. Sarah Jones plans a Speaker Program with expenses exceeding $1000. This violates one of the defined rules, so an error displays when she attempts to save the expense informing her that her expenses cannot exceed $1000. Sarah is prevented from saving the expense estimate until she reduces the expenses of her event.
See Examples of Expense Limit Rules for detailed examples of each of these types of rules.
Prerequisites
Creating Expense Limit Rules
All Event Rules are created from the Event Business Rules tab. The selected record type of the EM_Event_Business_Rule_vod record determines which fields admins must populate:
- Navigate to the Event Business Rules tab.
-
Create an Event Rule with the appropriate record type. The record type determines the type of rule:
- EM_Per_Event_Expense_Limit_Rule_vod
- EM_Per_Event_Attendee_Expense_Limit_Rule_vod
- EM_Attendee_Expense_Cap_Rule_vod
- EM_Cross_Event_Attendee_Expense_Cap_Rule_vod
- EM_Actual_Versus_Estimate_Expense_Threshold_Rule_vod
- Select Next.
-
Populate the following fields:
- Name
-
Expense_Type_vod – Use the lookup field to select the appropriate EM_Expense_Type_vod record.
Expense Estimates are not created if the selected Expense Type is not active or is a child of another EM_Expense_Type_vod record. Per Event Expense Limits and Per Event Attendee Expense Limit rules can use active Expense Types that are children of other Expense Types if the Expense Category is Actual.
- Warning_Type_vod – Select either Hard Warning or Soft Warning. See Warning Text and Tokens for more information.
- Warning_Text_vod – Displays the Veeva Message that displays if this rule is violated. See Warning Text and Tokens for more information.
- Comment_Required_vod – Displays only if the Warning Type is Soft Warning. Select one of the following options:
- Required – Organizers must leave a comment when dismissing a soft warning
- Optional – Organizers may leave a comment when dismissing a soft warning
- Hidden – The comment box does not display
- Run_Rule_Event_Action_vod – Enter the appropriate button name to run the rule whenever the event organizer selects the button. Enter only one button name and do not use any of the following buttons:
- Attendee_Reconciliation_vod
- Cancel_Event_vod
- Generate_Invitations_vod
- Generate_Sign_In_vod
- Manage_Attendees_vod
- Manage_Attendees_Hub_vod
- Preview_Event_QR_Code_vod
- Record_a_Call_vod
- Reschedule_vod
- Schedule_Engage_vod
- Send_Email_vod
- Start_Webinar_vod
- View_Signatures_vod
-
Populate the following additional fields based on the selected record type:
Rule Record Type
Additional Fields
Description
EM_Per_Event_Expense_Limit_Rule_vod
Expense_Category_vod
Restricts the rule to either Estimate or Actual Expenses.
Event_Status_vod
Restricts rule to run only on events in a defined Event Status.
Use the following format:
Status1;;Status2
For example,
Approved_vod;;Pending_Approval_vod
Leave this field blank to apply the rule to all events
EM_Per_Event_Attendee_Expense_Limit_Rule_vod
Expense_Category_vod
Restricts the rule to either Estimate or Actual Expenses.
Event_Status_vod
Restricts rule to run only on events in a defined Event Status.
Use the following format:
Status1;;Status2
For example,
Approved_vod;;Pending_Approval_vod
Leave this field blank to apply the rule to all events
Attendee_Account_Type_vod
Restricts rule to attendees with matching Attendee_Account_Type_vod fields on the EM_Attendee_vod object.
EM_Attendee_Expense_Cap_Rule_vod
Attendee_Account_Type_vod
Restricts rule to attendees with matching Attendee_Account_Type_vod fields on the EM_Attendee_vod object.
Attendee_Status_vod
Defines which events must be included for calculations, based on Event Status and Attendee Status. Use the following syntax:
;;Event Status 1:Attendee Status 1,Attendee Status 2;;Event Status 2:Attendee Status 1;;
For example, ;;Closed_vod:Attended_vod,Signed_vod
Leave this field blank to apply the rule to all attendees, regardless of status.
Date_Threshold_Type_vod
Defines the timeframe for thresholds for the rule.
Select one of the following:
-
Rolling_vod – See Rolling_Period_vod for more information
-
Calendar_Month_vod – States that the restriction applies to events before and after the scheduled event within the same calendar month
-
Calendar_Year_vod – States that the restriction applies to events before and after the scheduled event within the same calendar year
Rolling_Period_vod
Defines, in days, the rolling period.
This field applies the defined number of days both before the scheduled event and after the scheduled event.
This field should only be populated if Rolling_vod was selected for Date_Threshold_Type_vod.
EM_Cross_Event_Attendee_Expense_Cap_Rule_vod
Attendee_Account_Type_vod
Restricts rule to attendees with matching Attendee_Account_Type_vod fields on the EM_Attendee_vod object.
Attendee_Status_vod
Defines which events must be included for calculations, based on Event Status and Attendee Status. Use the following syntax:
;;Event Status 1:Attendee Status 1,Attendee Status 2;;Event Status 2:Attendee Status 1;;
For example, ;;Closed_vod:Attended_vod,Signed_vod
Leave this field blank to apply the rule to all attendees, regardless of status.
Date_Threshold_Type_vod
Defines the timeframe for thresholds for the rule.
Select one of the following:
-
Rolling_vod – See Rolling_Period_vod for more information
-
Calendar_Month_vod – States that the restriction applies to events before and after the scheduled event within the same calendar month
-
Calendar_Year_vod – States that the restriction applies to events before and after the scheduled event within the same calendar year
Rolling_Period_vod
Defines, in days, the rolling period.
This field applies the defined number of days both before the scheduled event and after the scheduled event.
This field should only be populated if Rolling_vod was selected for Date_Threshold_Type_vod.
Minimum_Spend_Limit_vod
The minimum spending limit.
Maximum_Spend_Limit_vod
The maximum spending limit.
EM_Actual_Versus_Estimate_Expense_Threshold_Rule_vod
Global_Rule_vod
Applies the rule to all countries, regardless of any countries associated via Event Business Rule Configuration records.
Percent_Threshold_vod
The percent allowable difference between an estimated expense and its corresponding actual expense.
-
- Select Save.
Creating Expense Limit Rule Configurations
After the event rule is created, admins must create an associated EM_Business_Rule_Configuration_vod record to determine which event type, country, and timespan the rule should apply to.
To associate event rules to EM_Business_Rule_Configuration_vod records, create a EM_Business_Rule_Configuration_vod record from the Business Rule Configurations related list of the appropriate business rule with the following field values:
- Event_Business_Rule_vod – Automatically populates with the appropriate event rule
- Event_Type_vod – Enter the appropriate EM_Event_vod record type the event rule applies to
- Country_vod – Use the lookup to select the appropriate Country_vod record. This field does not display if the Global_Rule_vod check box was selected.
- Rule_Start_Date_vod – Defines the start of the active period of the rule
- Rule_End_Date_vod – Defines the end of the active period of the rule
- Minimum_Spend_Limit_vod – Defines the minimum spend limit. Does not apply to Cross-Event per Attendee Expense Cap and Actual vs Estimate Expense Threshold Limit type rules.
- Maximum_Spend_Limit_vod – Defines the maximum spend limit. Does not apply to Cross-Event per Attendee Expense Cap and Actual vs Estimate Expense Threshold Limit type rules.
Only one business rule configuration can be active for each combination of Event_Type_vod, Event_Business_Rule_vod, and Country_vod.
Run Order of Event Expense Limit Rules
Multiple Expense Limit rules may apply to a single event or attendee. When this is the case, rules run in the following order:
- First, all relevant Per Event Attendee Expense Limit rules
- Then, all relevant Attendee Expense Cap rules
- Then, all relevant Cross-Event Attendee Expense Cap rules
- Then, Actual Versus Estimate Expense Threshold Limits
- Then, all relevant Per Event Expense Limit rules
Previewing Expense Limit Rules
Whenever an event organizer creates or updates an expense line or header in an event, all applicable Expense Limit rules run and display warnings of violations. If more than one expense line is saved as part of the expense header, applicable rules run for all expense lines.
If an expense violates a rule, a warning modal displays with the relevant warning text. Organizers can select Continue to continue the save or creation of the expense, or select the X button to dismiss the modal without saving or creating the expense.
Per Event Expense Limit and Per Event Attendee Expense Limit rules defined for estimates do not run in real time and thus do not display warnings.
Expense headers submitted to Concur are locked. Organizers cannot correct violations on locked headers or their associated expense lines. Organizers should resolve any hard warning violations before submitting an expense header to Concur.
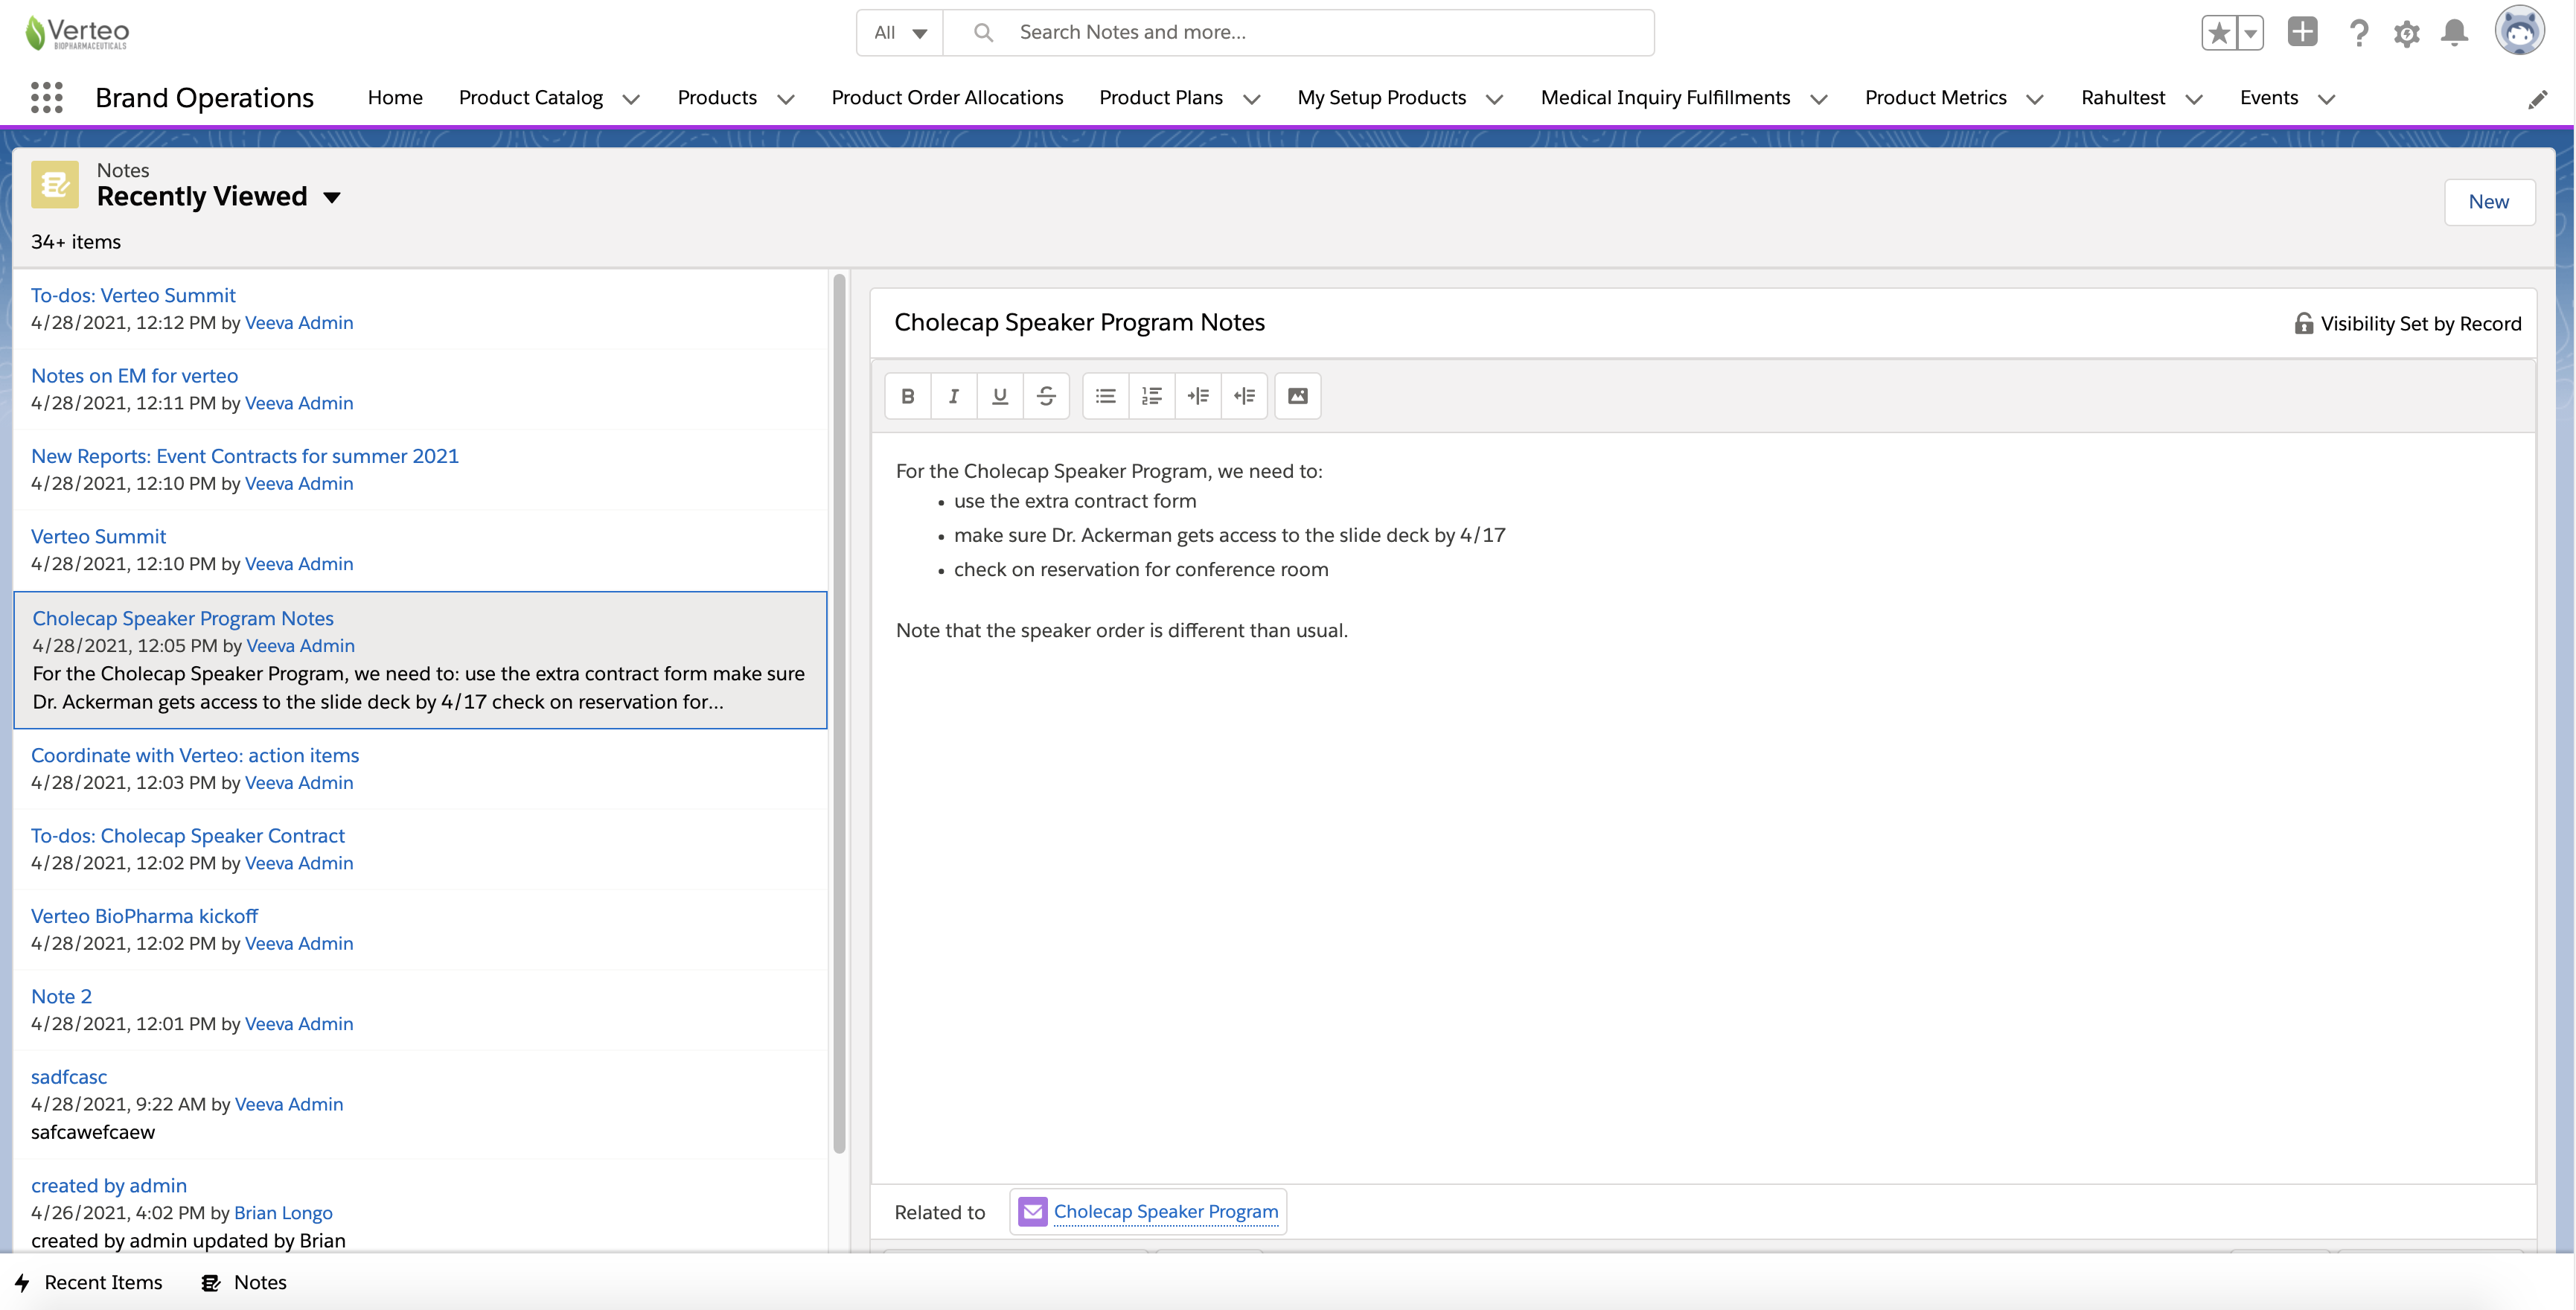
Using Notes in Lightning Experience
To enable collaboration on event planning, Online Lightning users can now use Notes for events management. In Salesforce Classic, users added notes and external files via the Notes & Attachments related list. In Lightning Experience, the legacy Notes & Attachments functionality is separated into two features: Salesforce Files, for attaching external files, and Notes, for creating rich-text notes on a record. Notes functionality is now supported for Visualforce pages on certain events-related objects, enabling Lightning users to leave relevant notes when planning and executing an event.
For example, Sarah Jones works with three colleagues to plan a speaker event for Verteo BioPharma. On the event contract record, Sarah creates a note with more information about the contract and speaker. The note is attached to the contract record via the Notes related list, where other users can view the note.
Considerations
- This feature is available when using Lightning for Events Management
- This feature supports Visualforce pages on the following objects:
- Contract_vod
- Contract_Partner_vod
- Expense_Header_vod
- EM_Attendee_vod
- EM_Event_vod
- EM_Event_Material_vod
- EM_Event_Budget_vod
- EM_Event_Speaker_vod
- For Notes on Visualforce pages, the Created By field displays the user who last modified the record, instead of the user who created the record
Using Notes
Users create new notes and manage existing notes from the Notes related list. There are two entry points for creating and managing notes: from the Notes page, or from the Notes pop-up panel.
Creating Notes from the Notes Page
To create a new note from the standard Notes page:
- Navigate to the appropriate record.
- Navigate to the Notes related list.
- Select the New Note button.

The columns displayed vary depending on the object. Column labels and headers are different for each Visualforce page type.
- Enter the appropriate text and title. Notes are automatically saved as the user types.
Users can edit, share, and delete notes from the Notes page.
Creating Notes from the Notes Pop-up
Creating Notes from the Notes pop-up, instead of the Notes page, enables users to view and navigate to other pages while editing the new note.
To create a new note from the Notes pop-up:
- Navigate to the appropriate record.
- Navigate to the Notes related list.
- Select the View All button on the Notes related list.
- Select the New button to create a new note. The notes pop-up panel displays, where users can edit, share, and delete notes while still viewing the Notes related list, or navigate to any other page in Veeva CRM.
To edit an existing note, select the note’s title in the related list. The existing note displays in a pop-up panel.
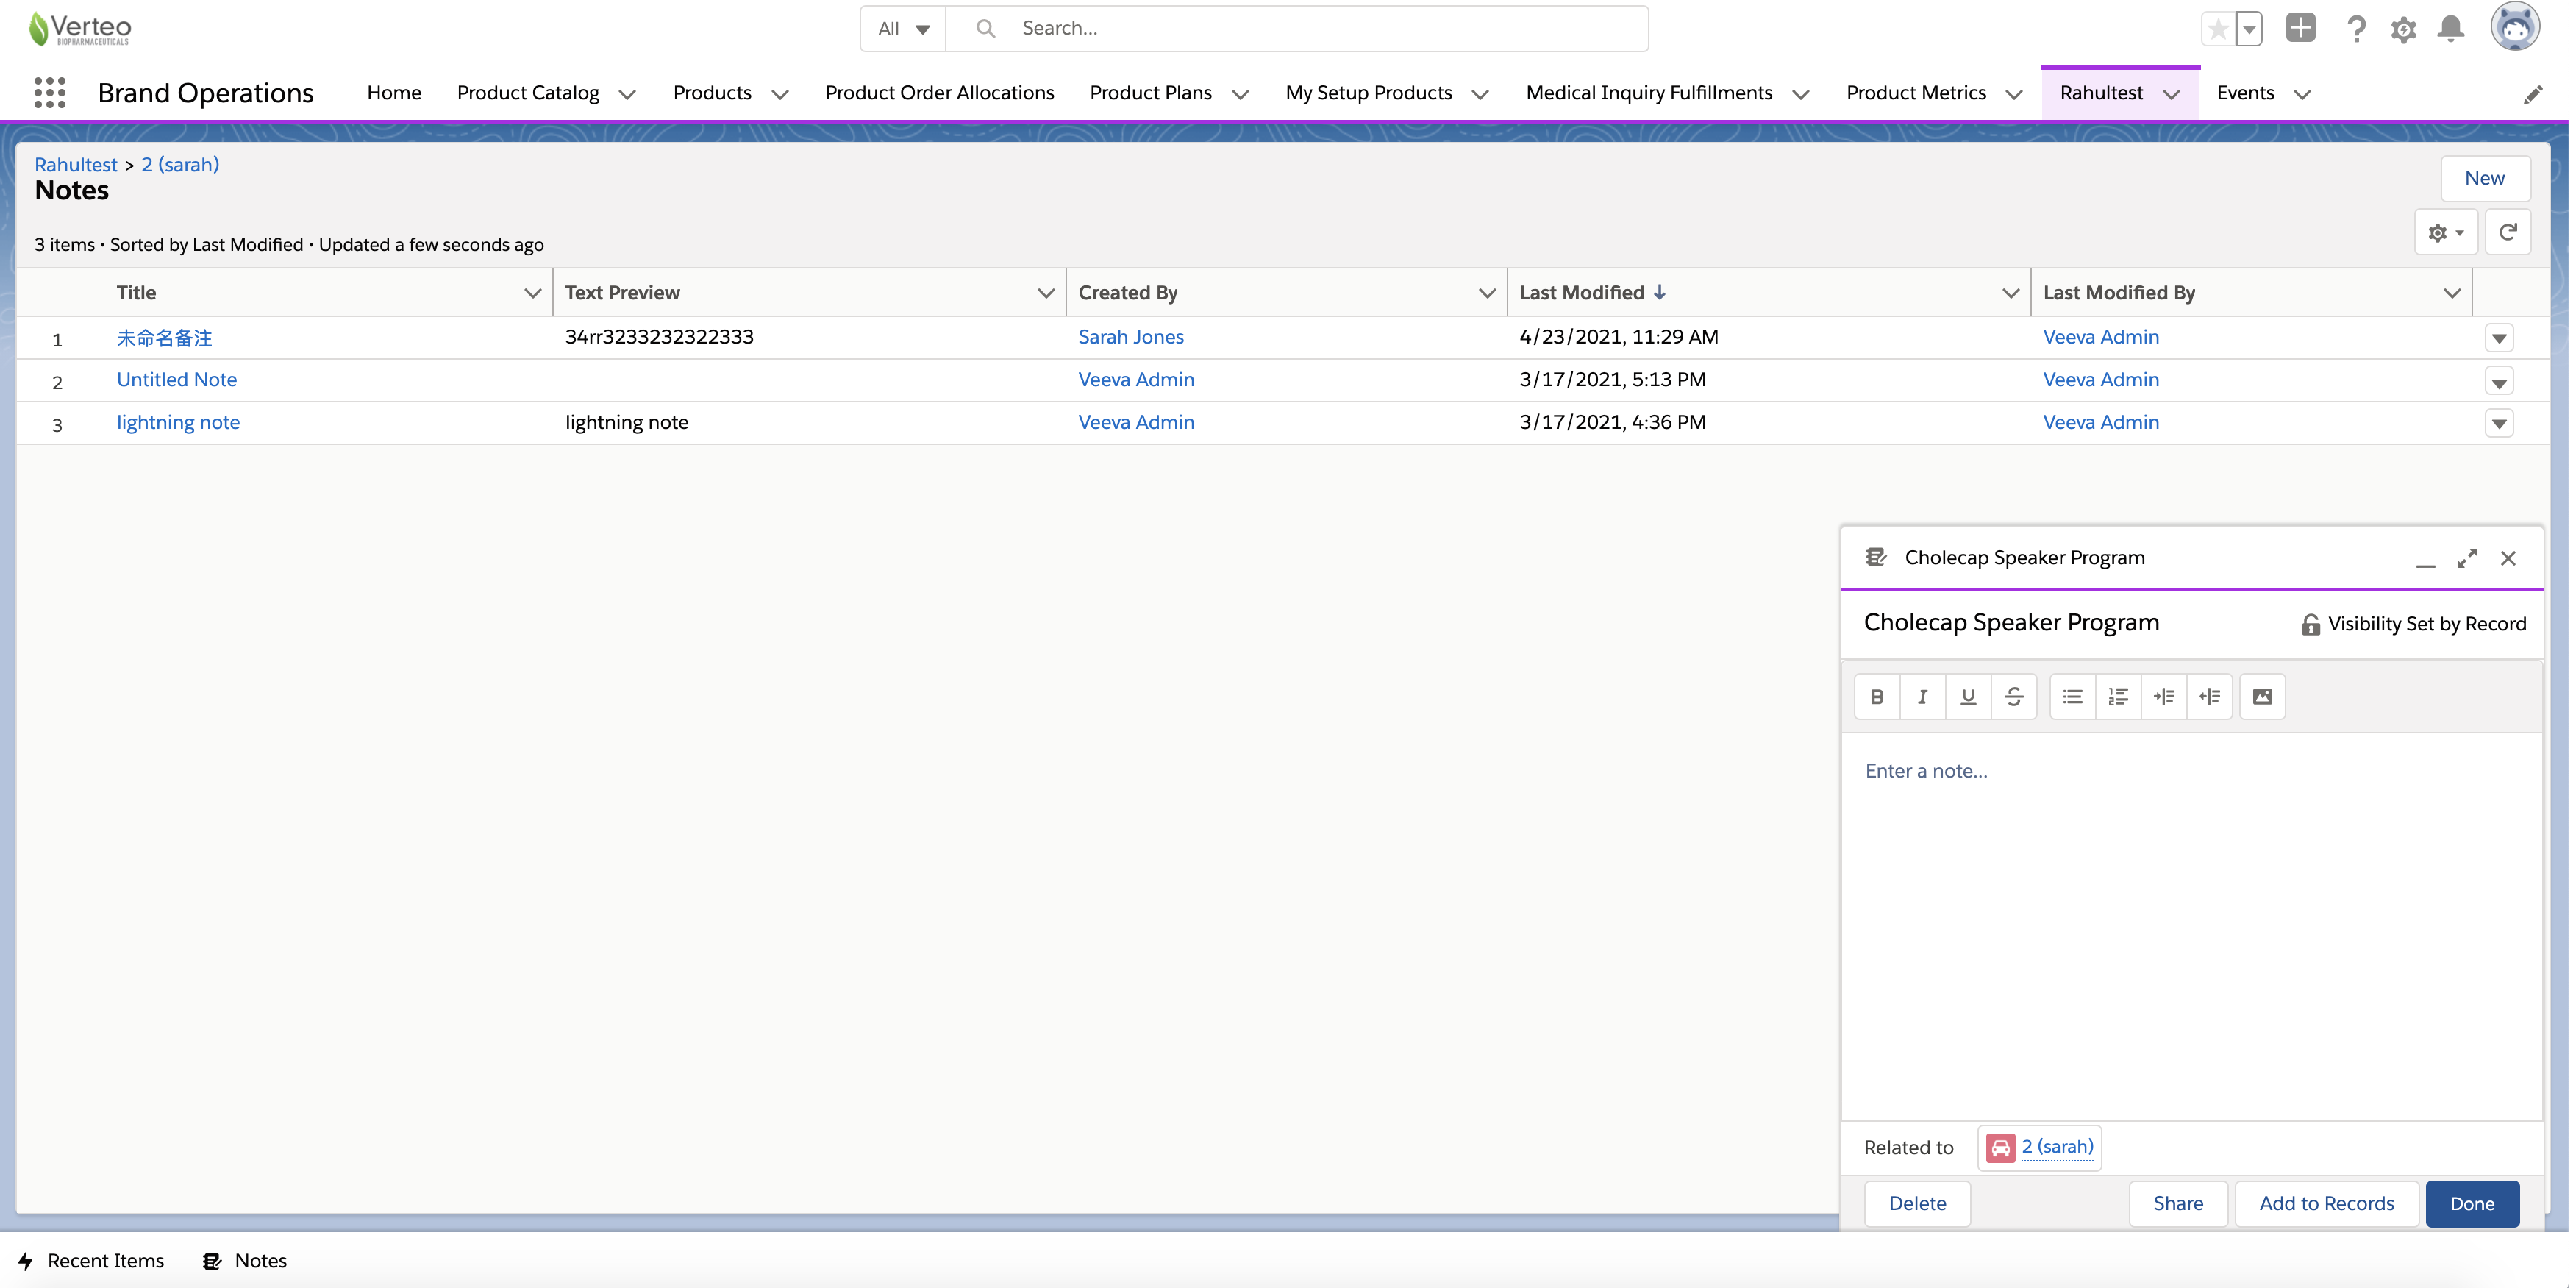
Relating Notes to Records
When users create a note from a record detail page, the Related To field is automatically populated with a link to the appropriate record. The same note can be added to multiple records.
When a note is added to an additional record, all other users with access to the record can view the note.
To search for and add the note to additional records, select the Add to Records button.
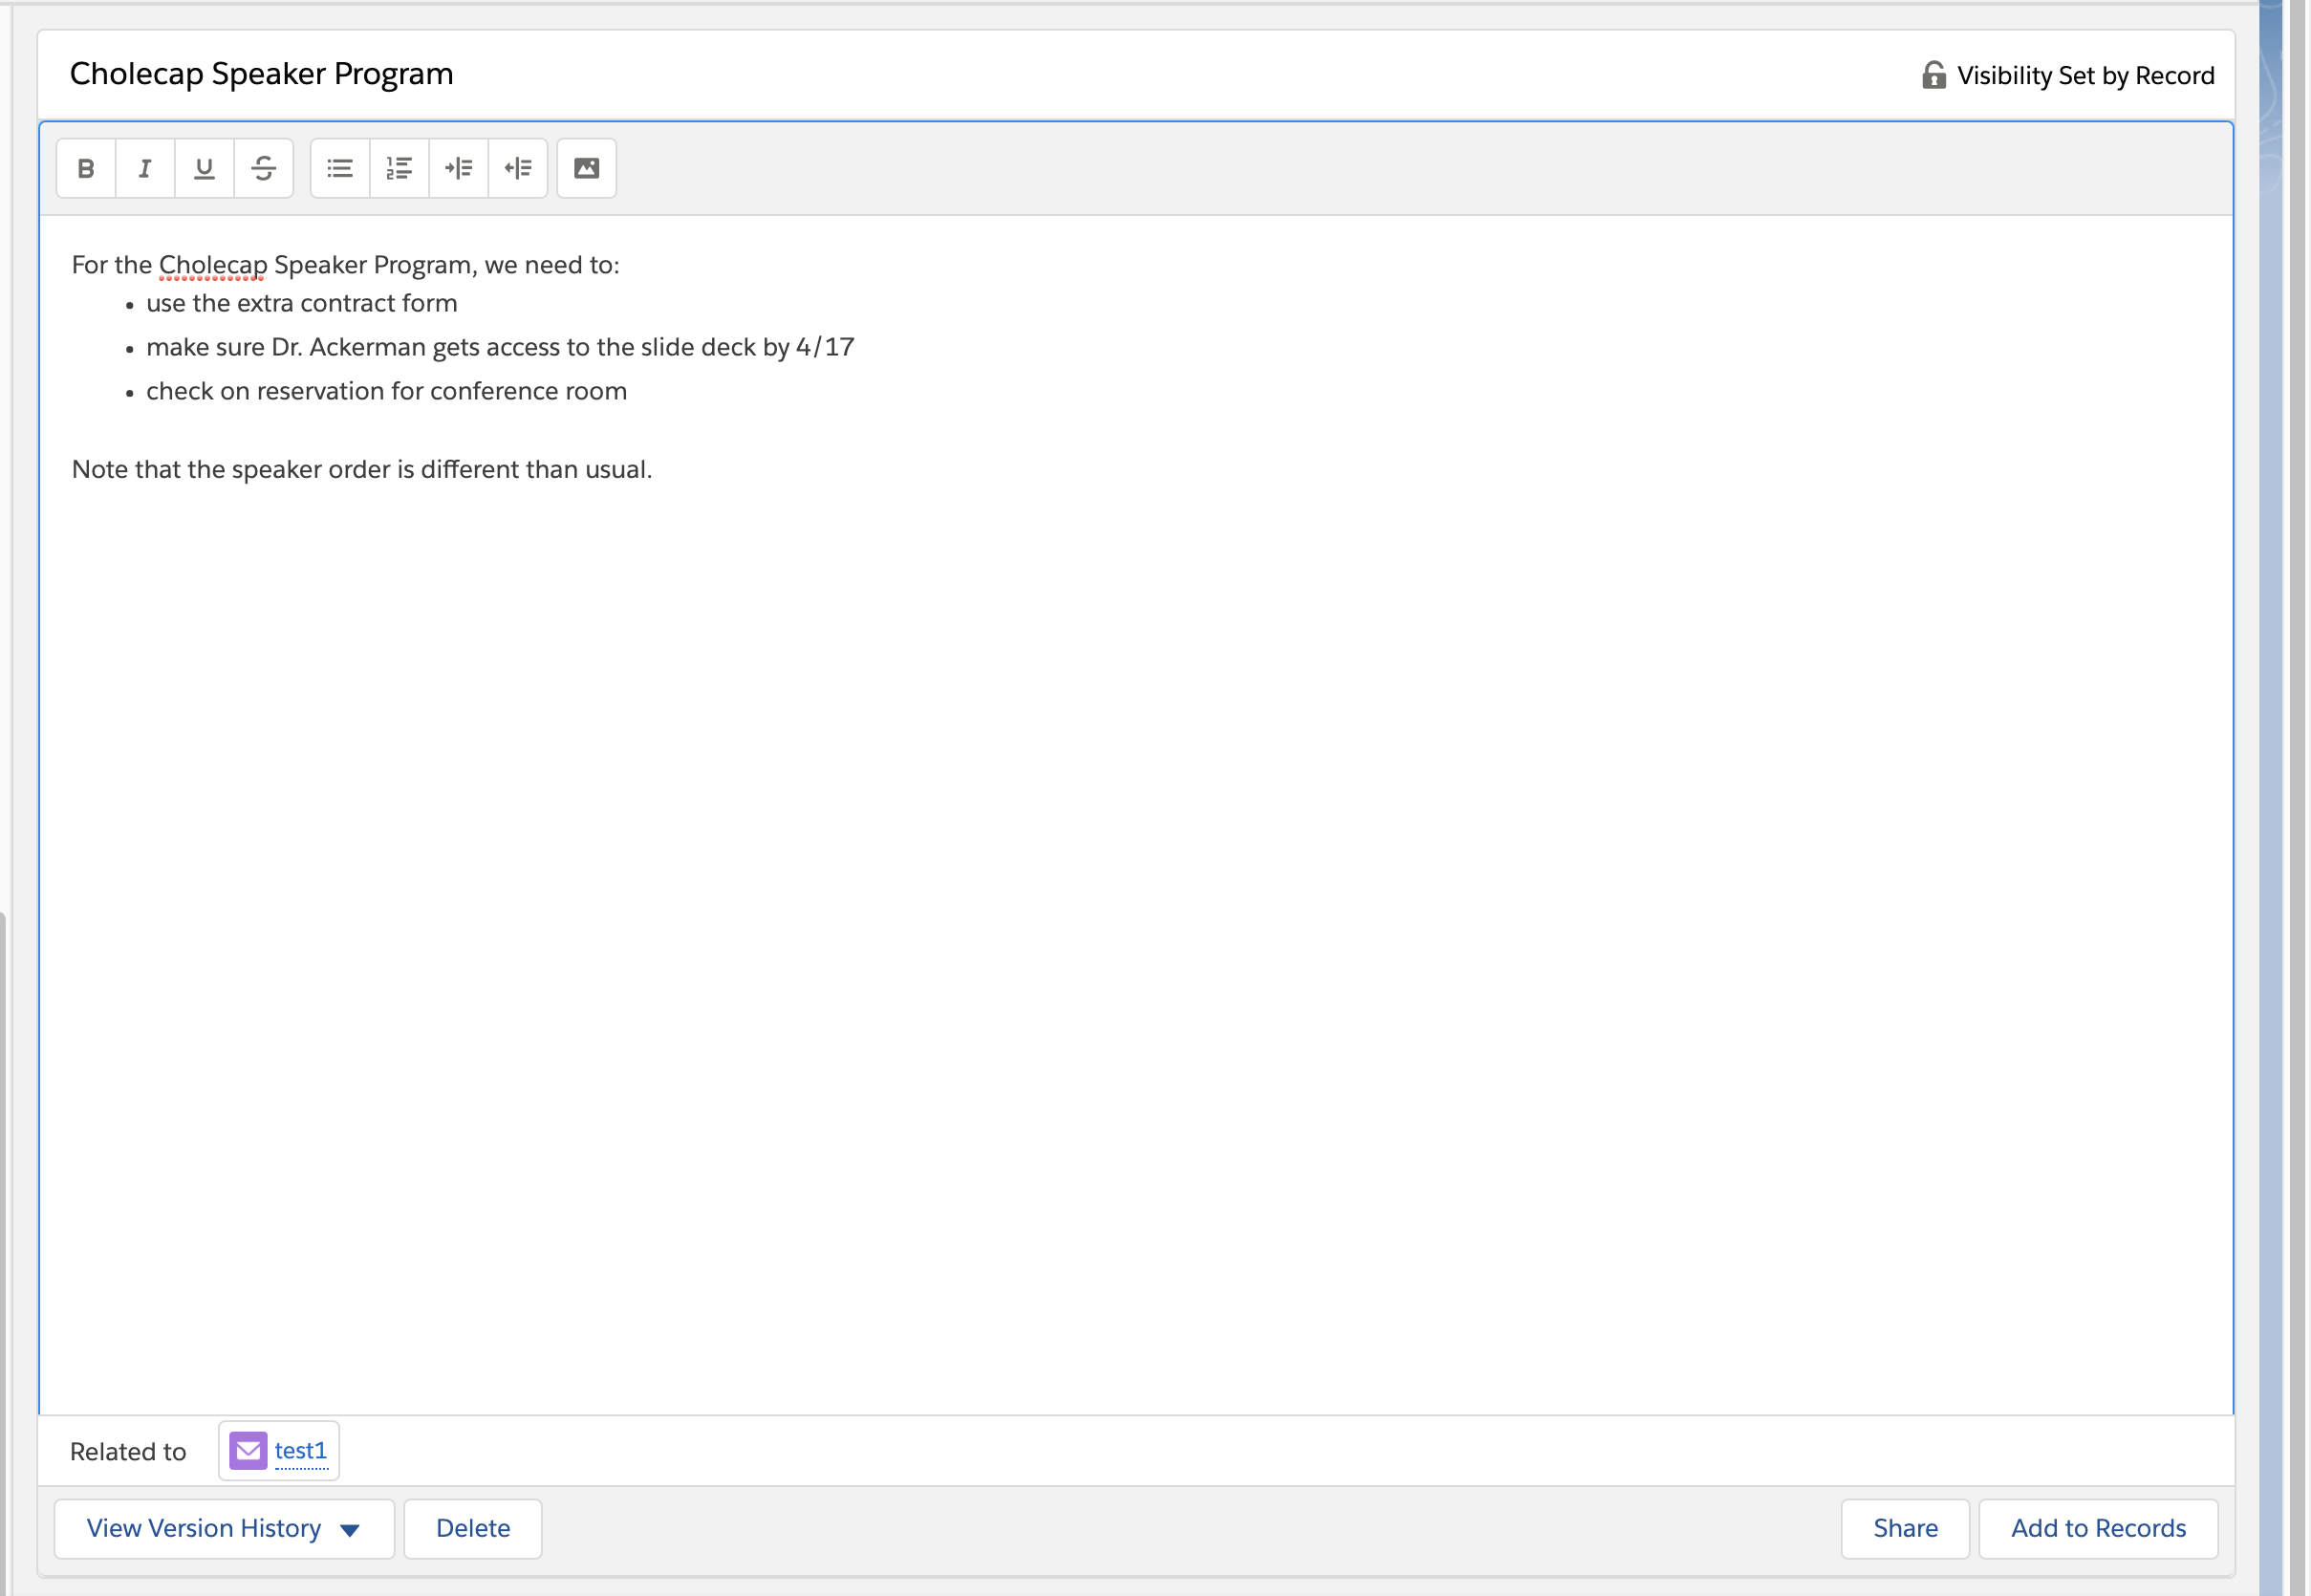
To return to the record detail page, select the appropriate link in the Related to field. Using the browser’s back button causes the page to refresh.
Editing Existing Notes
To edit an existing note, select the note’s title from the related list.
To view additional notes from the Notes related list on a record detail page, select the View All or Show All buttons.
If the Notes related list is not on the record type page layout for a particular record, users cannot view notes using the View All button.
For more information on using Notes, see Salesforce’s Notes documentation.
MyInsights Studio
Querying Veeva Messages and Manipulating Data Lists
Users can use the Veeva Messages data element to query existing Veeva Messages from Veeva CRM. To manipulate lists of records from existing data elements, users can use the Sort List, Filter List, and Sublist data elements.
Using the Veeva Messages Data Element
Users can query Veeva Messages from Veeva CRM using the Veeva Messages element. This element queries existing Veeva Messages, so users must create any custom Veeva Messages in their orgs before they can be used in MyInsights Studio. Users can use custom Veeva Messages as translations for custom text, for example, using a field calculated by a One for One element as a label. When the MyInsights page is deployed to users in a multi-country org, the Veeva Message in the correct language displays for each user.
Users can select Add to query multiple Veeva Messages at once. Users must populate the following information for each Veeva Message:
- Category – Category of the Veeva Message
- Name – Name of the Veeva Message
Using the Sort List Data Element
Users can sort a list of records from an existing data element by a calculated field using the Sort List element. A calculated field refers to any field created as a result of a data element, for example, the One for One element. Users must populate the following information:
- Data Source – An existing data element. Only data elements with a list of records as output are available.
- Sort By – A calculated field selected from the Data Source or a data calculation entered directly. Users can select Add to add fields, which are used to sort records in case of ties. Users can select the sort order for each field.
Using the Filter List Data Element
Users can filter a list of records from an existing data element using the Filter List element. Users must populate the following information:
- Data Source – An existing data element. Only data elements with a list of records as output are available.
- Filter by – A boolean expression. The results only contain records for which this boolean expression is true.
Using the Sublist Data Element
Users can get a subset of a list of records from an existing data element using the Sublist element. Users must populate the following information:
- Data Source – An existing data element. Only data elements with a list of records as output are available. The order of the output records is maintained.
- Skip this many – Number of records to skip, starting from the first record in the list.
- Keep this many – Number of records to keep, starting from the record immediately following the last skipped record.
Network
Mapping National Identifiers to Veeva CRM
Multi-country orgs can pull in national and healthcare identifiers from Network for compliance purposes using Veeva-provided fields. This enables admins to populate this information in CRM without needing to create custom fields.
For example, Alice Adams administers a multi-country org and needs to add national and healthcare identifiers to her org for compliance purposes. These fields in CRM populate with information from Network when the two systems sync.
